Learning
Microsoft PowerPoint: Top 10 Tips You Need To Know!!

(CTN NEWS) – Microsoft PowerPoint is the most widely used presentation-making program for many people who work in business, education, and entertainment. It takes little time to become accustomed to using it, and is simple and quick to create.
But if you want to fully understand it and make the most of the program, keep reading as we quickly go over some of the top 10 shortcuts, tricks, and tips that will help you become an expert in PowerPoint.
The PowerPoint tips and tricks described here are for the most recent Windows version; some features may not be available or appear slightly different for macOS and web users.
1. To Rapidly Go Live, Press F5.
Don’t attempt to click the tiny icon in the bottom right corner of the screen or utilise the menu (Slide Show > From the beginning…) to start a presentation. There is a technique to do this that is considerably easier.
Just press F5 on your keyboard!
Using a simple keypress will make you look like a total pro if you have to utilize an ancient laptop without a mouse or a malfunctioning trackpad. However, some devices need you to hold down the Function key (Fn) before pressing the F5 key.
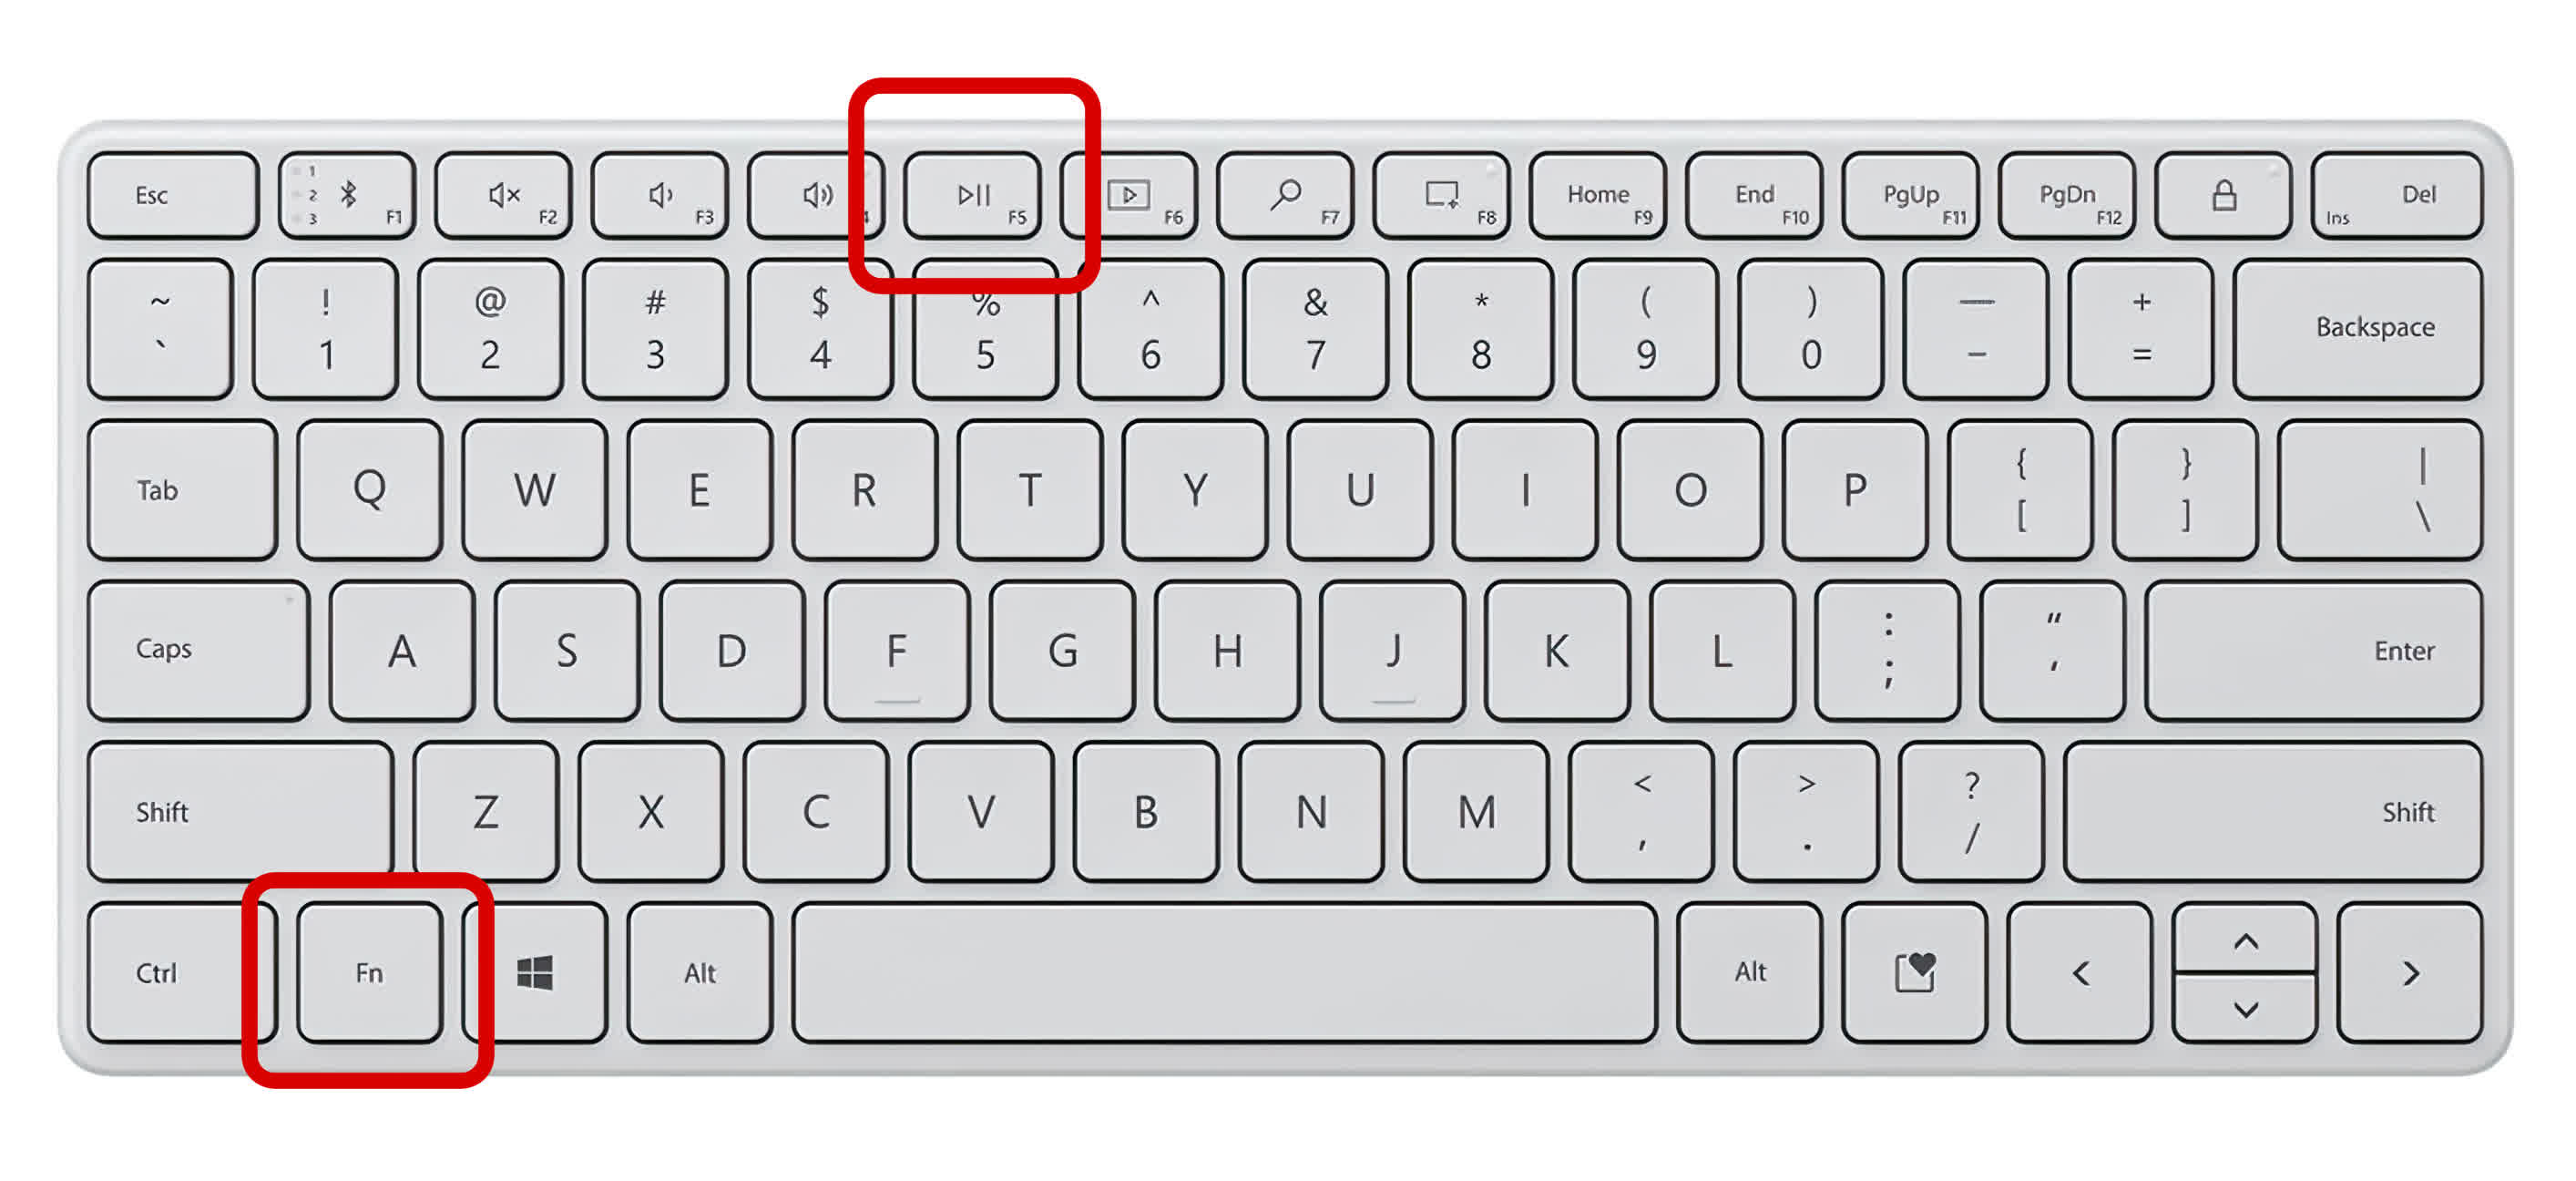
Some keyboards need you to press or hold the Fn button before hitting F5/ TechSpot.
Some keyboards require you to hold the Fn button while pressing the F5 key.
Select the slide you wish to start from and press Shift + F5 to begin a presentation anywhere in the slides list. It has never been simpler to go live.
Instead of pressing F5, macOS users should press Cmd + Shift + Return or Command + Return for Shift + F5’s counterpart.

TechSpot.
There are, of course, many more keyboard shortcuts, one for practically every PowerPoint function. It would be impossible to list them all. However, Microsoft offers two significant sets of shortcuts—one for making presentations and another for presenting them.
However, as with many Microsoft/Office programs, merely pressing ALT will show you the keys you need to press to do a particular action.
2. Using Rulers And Guides, Align Components To A Grid
Don’t waste time dragging anything with the mouse or the arrow keys to have everything in a slide aligned properly. Turn on the Snap to Grid feature instead.
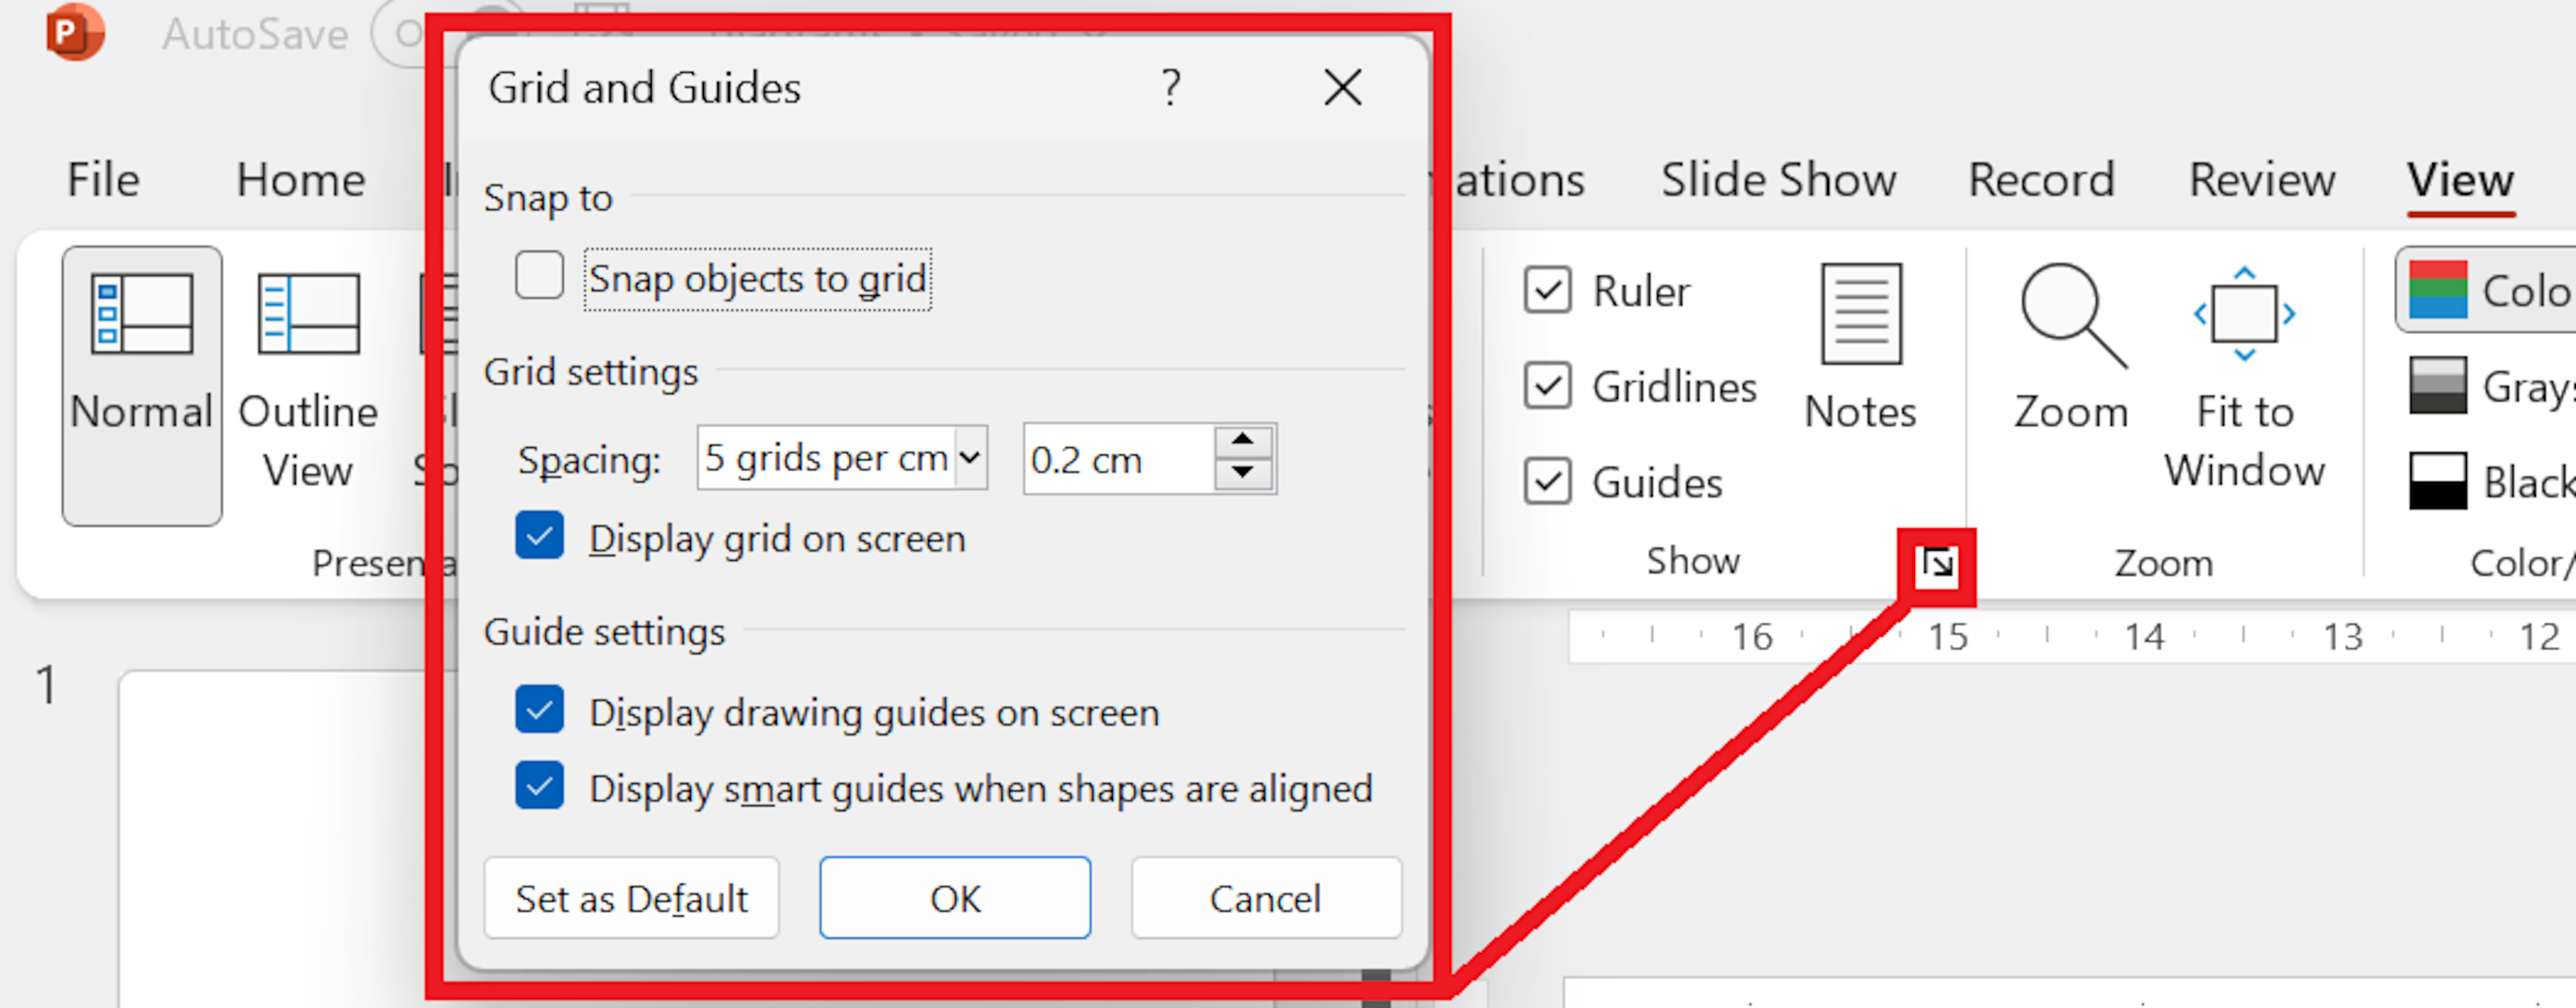
You may help with alignment and positioning by adding lines to your slides by selecting the Ruler, Gridlines, and Guides options under the View menu. However, a new window will open if you click the tiny menu button directly beneath where you enabled the guides.
TechSpot.
Here, you may turn on Snap items to grid, which causes objects to now automatically lock onto the closest gridline as you move them around.
The default number of gridlines per cm is 6, but you may modify it by using the drop-down menu or adjusting the gridline spacing. You can also set a custom number of gridlines per cm (as shown in cm).
You will obtain more gridlines per centimeter the smaller this number is.
Even with snapping turned on, if an object isn’t precisely where you want it, click on it and then move it around while holding down the CTRL key and pressing the arrow keys.
3. Professional Copycatting
Everyone knows how to copy and paste text and objects onto a PowerPoint slide by pressing CTRL + C, followed by CTRL + V. There are additional techniques, however, that are useful when creating numerous copies of the same shape to produce a symmetrical pattern.
The new shape overlaps the original when you copy something and subsequently paste it. Then, as is customary, you would move it into place using the mouse or keyboard.
Here’s a far better method: click and hold the CTRL + Shift keys as you click and hold the mouse button on the shape you want to replicate.

TechSpot.
You’ll notice that a fresh copy is automatically created and is perfectly aligned with the old one when you move the mouse to the side or up/down! No more attempting to align shapes by moving them around.
Once you’ve completed this, click CTRL + Y to go through the process again; the spacing and alignment are copied across, making it simple to assemble an exact symmetrical group of objects.
4. Using Smarts To Create Greater Art
Although you can add a wide variety of preset shapes to slides, they are devoid in originality. Breaking apart SmartArt forms is one option if you want to utilize something better but don’t want to avoid attempting to design your own.
For instance, the typical block arrows are quite uninteresting and have few uses, so let’s change that immediately.
Activate Insert > SmartArt > Process. Select Upward Arrow from the menu by swiping up from the bottom.

TechSpot.
After clicking on that, a cool-looking arrow will appear.
It’s surrounded by many things that you might not need.
Simply perform right-click on any vacant area of the newly added shape, choose Ungroup from the menu’s Group option, and then click OK. Repeat this process and then click CTRL+A to select everything on the slide.

TechSpot.
If the slide contains many items, drag a highlighting box around the arrow.
To deselect it, hold down CTRL while clicking the arrow, and then press Delete to eliminate all undesirable components.
Now that you have a neatly curved arrow, you may change its size or color to whatever you like. It’s worthwhile to investigate all of the other SmartArt elements to see what new forms you can create because this technique works with a wide variety of them.
5. Combining Clever For More Art
Using PowerPoint’s Merge Shapes tool is a helpful alternative to just grouping things together to create a new shape if you do feel like creating your own.
Imagine that we desire a square with a hole in the center. Using the standard Insert > Shapes menu, begin by placing a distinct shape and circle.
Making the circle white, laying it over the square, and assembling the pieces would allow us to create the desired object.
However, because grouped objects continue to exist as individual entities, the file size for the entire PowerPoint presentation may increase if your slides contain numerous complicated shapes.
The benefit of merging is that everything merges into one object.

TechSpot.
The obvious drawback is that you can’t ungroup something and start over if you wish to change or edit it; instead, you must use the Undo feature (CTRL + Z). Yes, but only if you choose one of the merge choices.
Select the forms you wish to combine by dragging a highlighting box around them (click and hold the left mouse button) or by holding down the CTRL while you click on each of the separate shapes.
There are five methods for combining shapes:
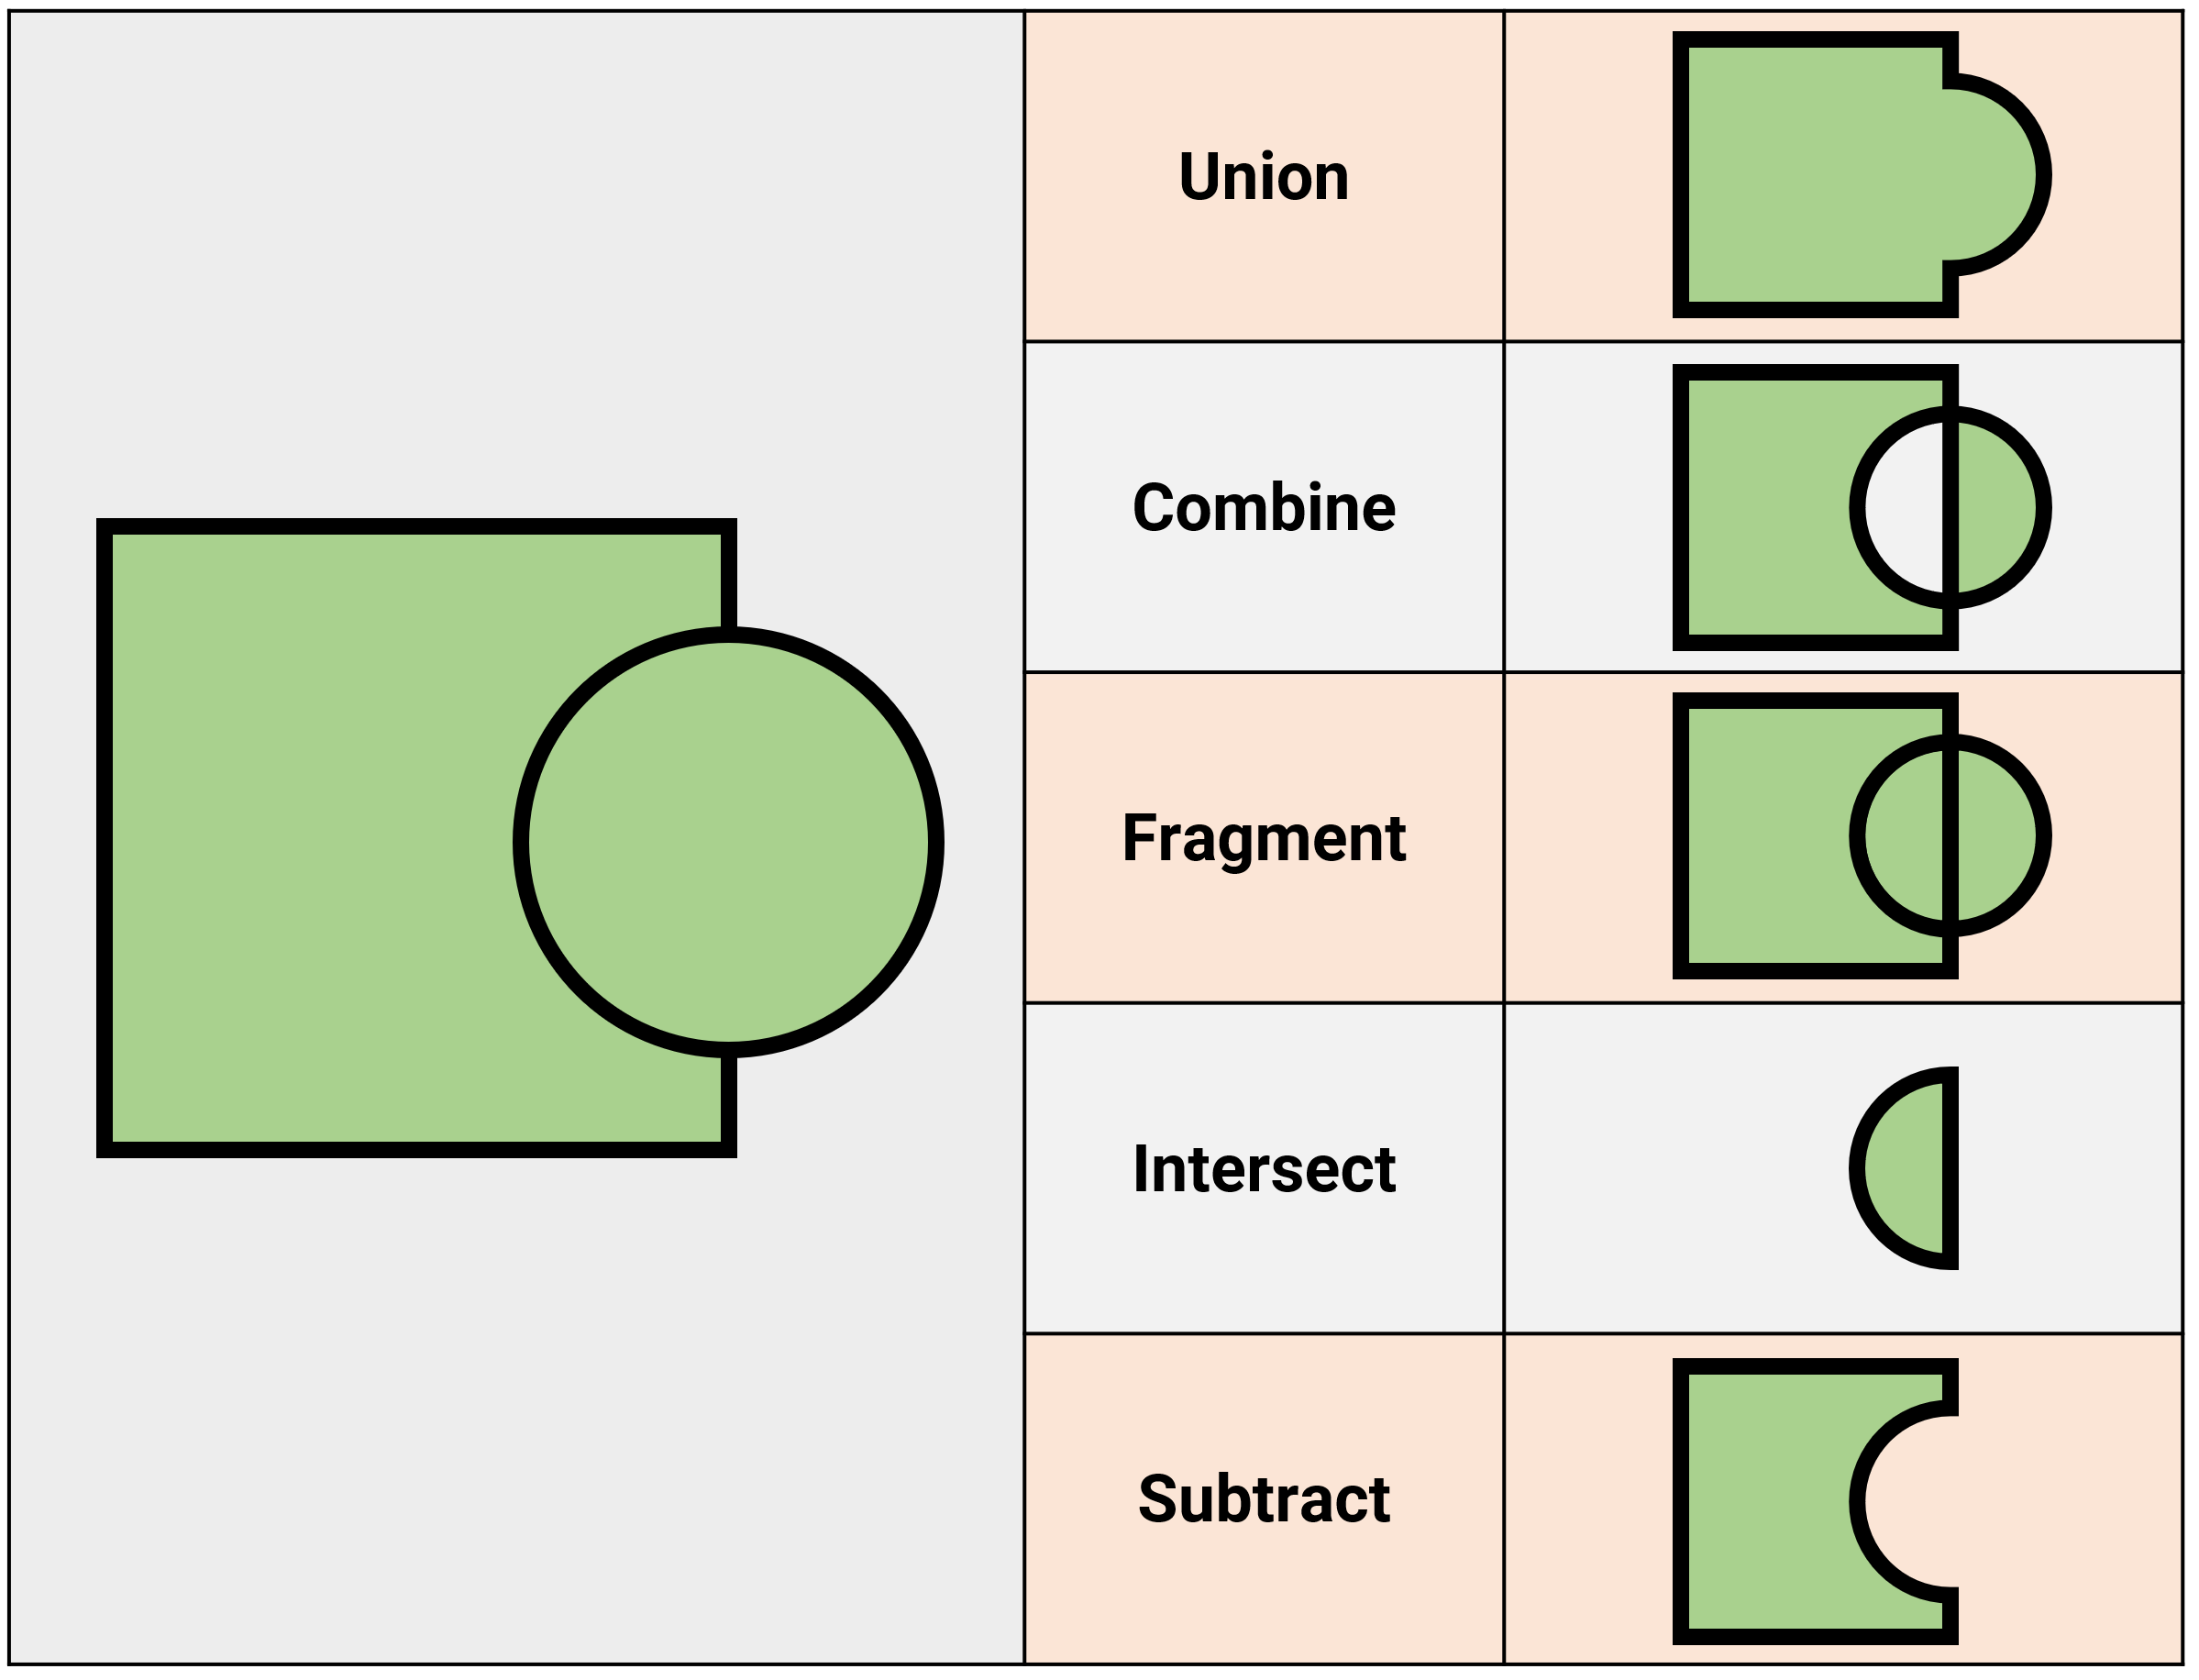
- Union — add shapes, ignoring any overlapping content
- Combine — add shapes, removing any overlapping content
- Fragment — split any overlapping content into new shapes
- Intersect — create a new shape from the overlapping content, deleting the rest
- Subtract — use the shape that’s in front of the other(s) as a mask, deleting it and any overlapping content
The following is what these options do to a circle overlapping a square:
TechSpot.
It’s vital to keep in mind that the front-to-back ordering of the forms you’re merging affects the outcome; for example, in the Subtract example in the above image, the circle cut the square since it was in front of it.
The square would split the circle in half and leave behind a semicircle if the forms were in the opposite order. Therefore, it’s worth trying several things to acquire the unique shape you want!
6. Rotating Shapes: The Key(s) To Improve Reversals
In the most recent releases of PowerPoint, there are a few different ways to rotate shapes. A rotating arrow should appear next to the object’s shape when you click on the item.
Click and hold this arrow while moving your mouse to rotate the thing.
But it’s difficult to do this precisely, especially on laptops with subpar trackpads.
Use the format menu to enter a precise angle size for the rotation (right-click on the shape, select Format object, and then select the Size & spacing icon), but don’t worry.
The best approach to rotate an object is to utilize the keyboard; while holding ALT, press the left or right arrow key to rotate the shape through 15°, or while holding ALT+CTRL, press the left or right arrow key to rotate the shape through 1° of angle.
This technique is by far the finest for rotating very small forms, and with some experience, you’ll be able to spin objects swiftly and precisely.
7. Get What You Sow: Crop And Edit Images Within The App
According to the adage, a picture is worth a thousand words, but picking the correct style for any photos incorporated into a presentation can be a little challenging.
Because PowerPoint has some useful capabilities for quick and simple picture manipulation, you won’t need to utilise another program.
The Crop tool is undoubtedly the best feature.
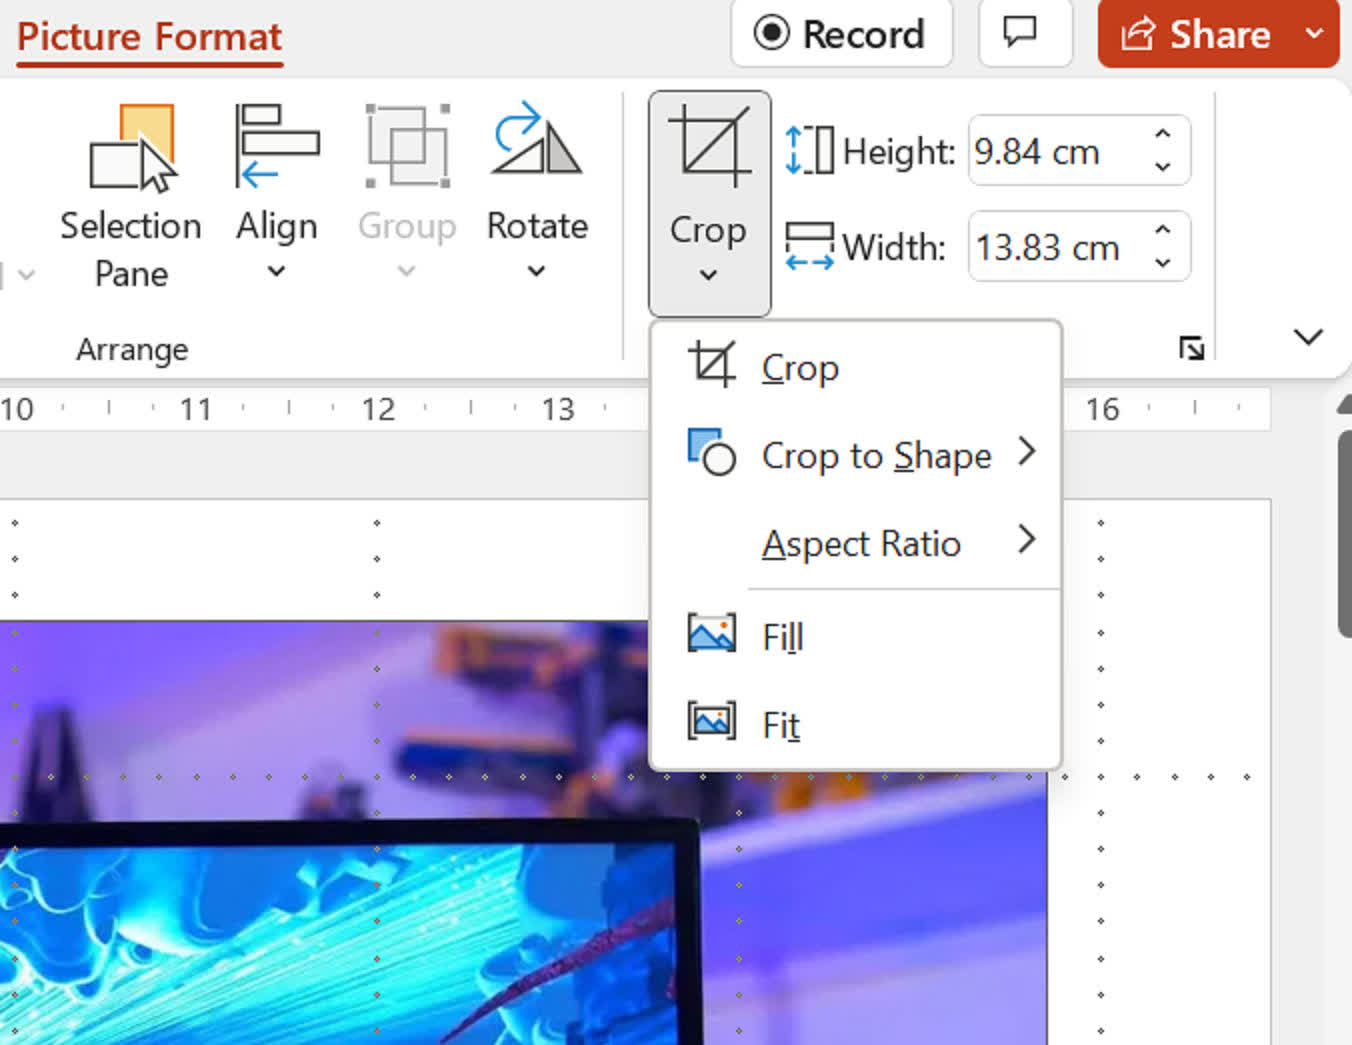
To begin, drag & drop an image into a slide using the Insert > Pictures > This device menu option. If the Crop tool is unavailable in the toolbar, click on the image and select Picture Format.
TechSpot.
Let’s carefully consider the possibilities since there are plenty to choose from. The first option, titled Crop, will create a number of brief, substantial bars all around the picture.
The image will be cut in half, leaving the portion that isn’t dark behind if you click and hold down the left mouse button while dragging a dark area across the image.
However, unless you click outside the image, nothing will happen.

TechSpot.
This implies that you can return and change the cropping area till you’re happy. If you’re not satisfied with the results, you can always use Undo to return to the original picture.
Note that the corner bars only allow you to produce a piece of the image that is rectangular; they do not apply a diagonal cut effect. You’ll need to utilize a different cropping function to do something finer.
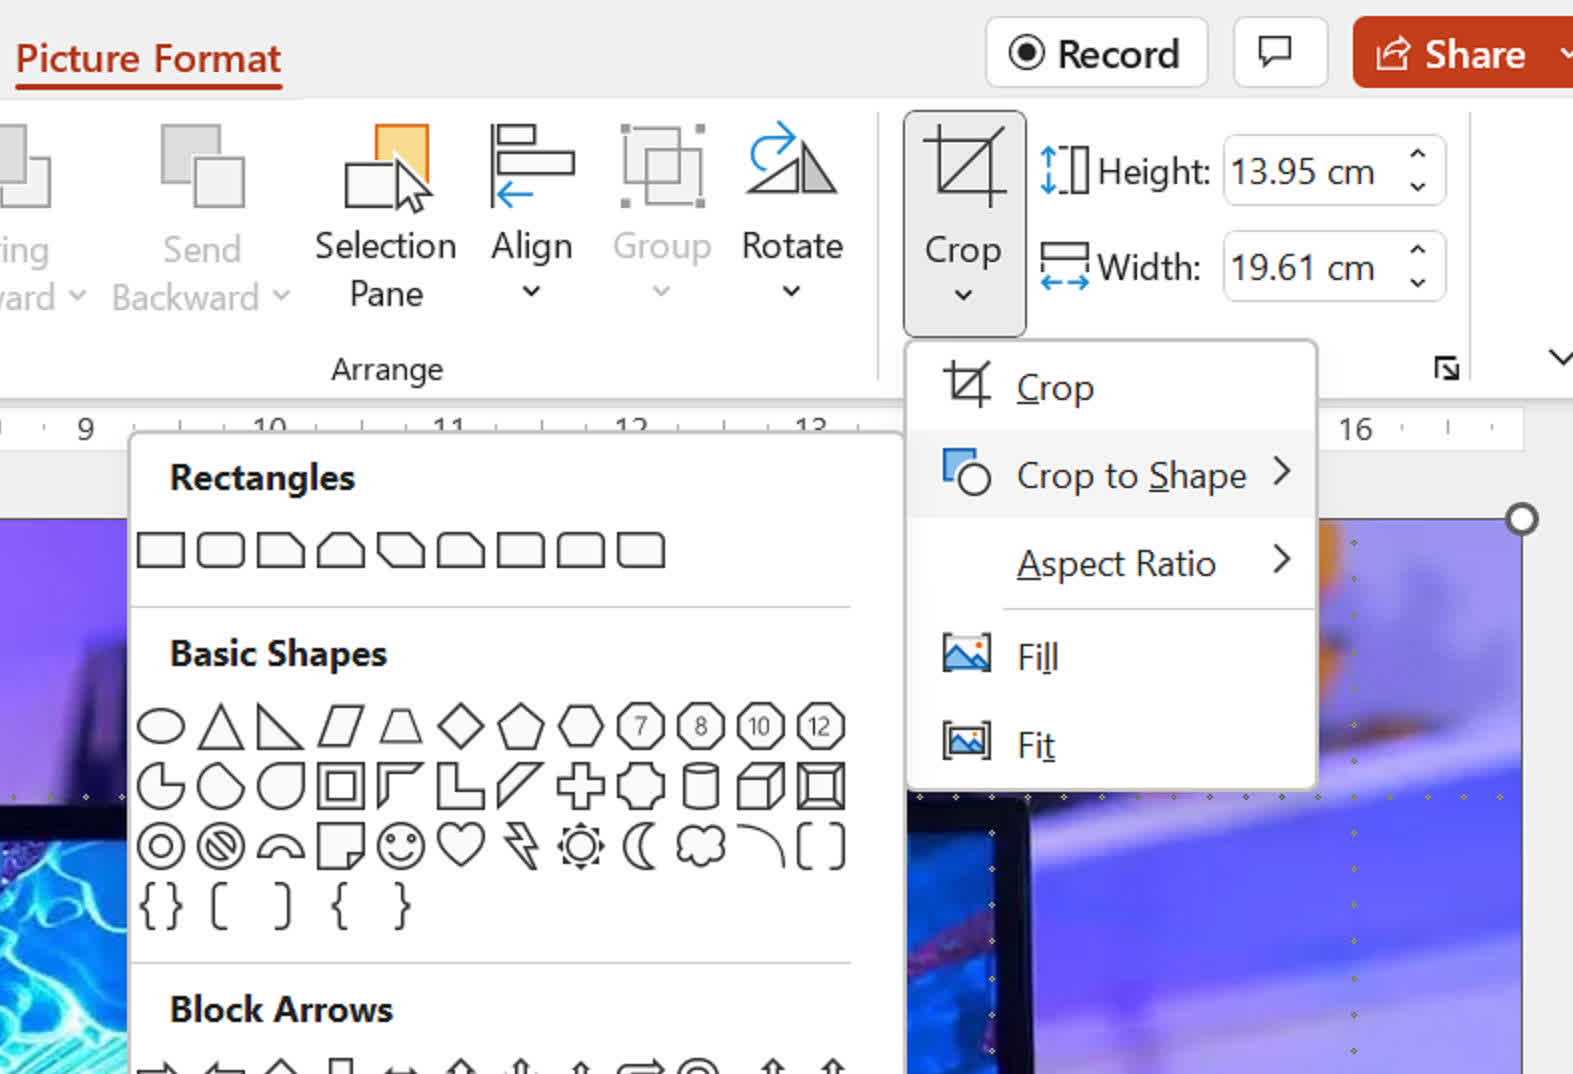
The image will be divided up using either a predetermined height-to-width ratio or a standard shape as a mask in the next two cropping options (Crop to Shape and Aspect Ratio).
TechSpot.
Crop to Shape is particularly helpful for generating images more creatively impactful than the original.
Although not all shapes make for excellent crops, some, like the curved corner rectangle or the block arrows, can readily add the visual impact you’re looking for to your presentation.
After using Crop to Shape, you should choose the last two options (Fit and Fill). A fresh set of black bars will surround the image if you choose one of these.

TechSpot.
Here, both crop-to-shape and fill have been applied.
Although you might lose some of the images in the process, fill will make the image fill the entire shape. While maintaining the image’s aspect ratio, Fit will attempt to make the image fill the shape.
You can make your cropping mask by sketching out various shapes and putting them together (CTRL+A to select them all, CTRL+G to group them).
Copy the image you wish to crop (CTRL+C), then right-click your new mask and choose Format Shape from the contextual menu.

TechSpot.
Select Picture or texture fill from the formatting choices’ Fill section, then select the Clipboard button. After that, your copied image will be pasted into the shape of your mask.
Spend time practicing and experimenting with the many possibilities and cropping options, just like with all of these tools. You may always go back and reverse your adjustments and try again because the original image is never ever lost in any way.
8. Decide On Stealthy Shapes That Overlap Or Are Hidden
It can be challenging to highlight the object you want to move or edit if it is concealed behind a stack of other shapes on a slide with numerous objects spread about.
Fortunately, PowerPoint offers a straightforward technique that enables you to choose an object fast even if you can’t see it.
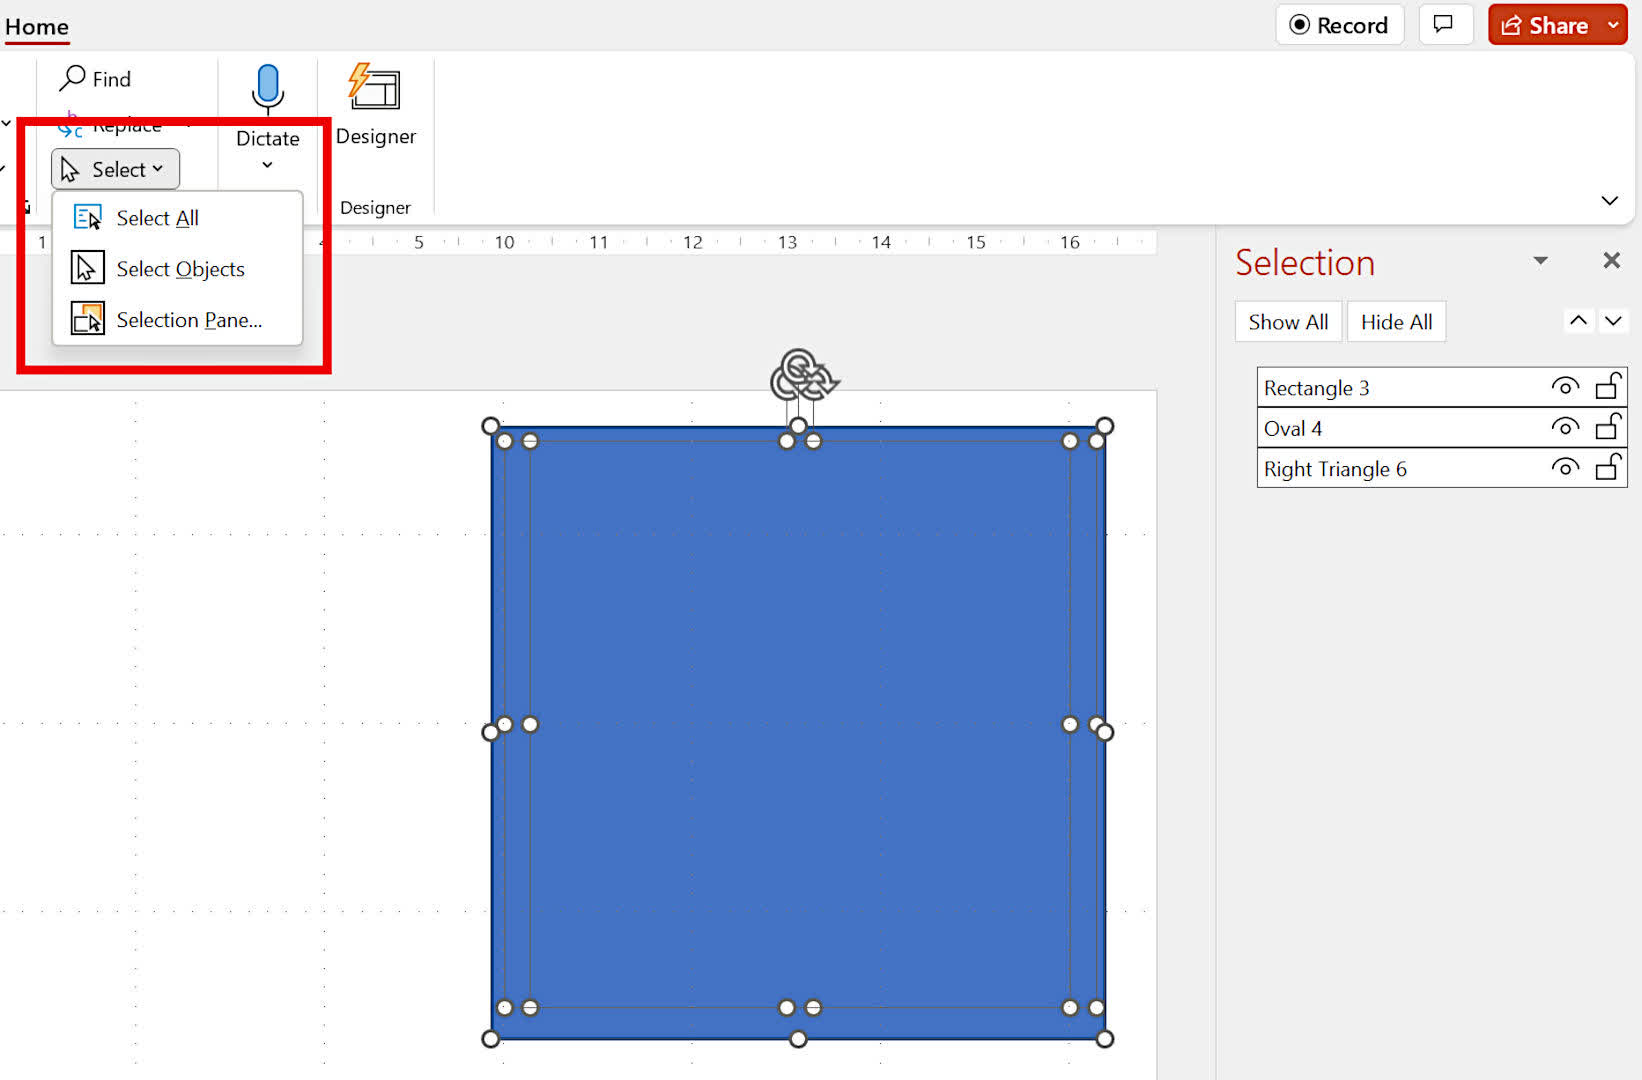
Consider a situation where a square, a circle, and a triangle are present. They are fully obscured because the square is larger than the other two and is in front of them.
TechSpot.
Let’s assume that we wish to alter the circle. To control the objects, click, hold, and drag a highlight box around them. then click Select on the Home toolbar (or consecutively press ALT, H, S, L). Next, select Selection Pane.
Our three objects are arranged here in front to rear order. Any object in the list that is clicked automatically becomes selected, allowing you to move it about, alter its color, or completely remove it.
The object will no longer be visible when you click the tiny eye icon.
While you can still modify the form’s color, the padlock icon will lock the shape and prohibit you from adjusting its size. Even the trickiest slides will now be easy for you to chop and alter!
9. Almost Present With Clever Narration
PowerPoint presentations are frequently required when presenting a talk or lecture, but they don’t require you to be present in person.
You may insert your virtual presence into any slideshow with the appropriate tools and a few minor mouse clicks here and there.
You’ll need a good microphone attached to your computer and a calm space free of echo.
Create all of the necessary slides and material first, then add an audio recording (Insert > Audio recording) to each slide. A speaker symbol will appear on the slide, and a little window will pop up.

TechSpot.
Click the tiny red circle to begin recording after giving each recording a distinct name, even if it’s only “audio slide 1.” Click the tiny square next to it once you’re done.
Click the play button to hear it all through unless your narration for each slide is exceptionally extensive. Simply press the record button to replace your previous work if you’re unhappy.
Once you’re satisfied with the recording, click the OK button, then right away select the Speaker icon from the main toolbar, followed by the Playback option.

TechSpot.
There are a few things to check to ensure you have set up correctly for automatic narration.
Make sure that Play across all slides, Loop until stopped, and Rewind after playing are all unchecked after switching the Start mode to Automatically. Finally, select the option for Hide During Show.
If there is too much silence at the beginning or conclusion of the recording, you can cut the audio in this same region and choose when the narration begins and end.
With each slide transition, the narration will automatically begin, and the speaker symbol will be hidden, thanks to all of these settings. The slides will advance automatically by running the audio on their own as well.
10. No Laser Pointer, No issue!
If you’ve forgotten your laser pointer for a presentation or the batteries have run out, this final tip will come in handy.
Start your PowerPoint presentation (remember tip #1!), and you’ll observe that a cursor will appear on the screen as soon as you move the mouse or touch the touchpad.
It will transform into a perfect laser dot if you press and hold the button while clicking and holding the left mouse button.

TechSpot.
Although it’s not the best thing in the world, and managing the keyboard and mouse/trackpad simultaneously can be challenging, it’s a useful alternative to a pointer.
RELATED CTN NEWS:

Learning
First-Time Buyer’s Guide to the UK Property Market

Entering the UK property market as a first-time buyer can feel both exciting and daunting. The process is filled with potential pitfalls and complex decisions, but with the right guidance, it can be navigated smoothly. The estate agents in Yorkshire demystify the journey from the initial decision to buy a home to the moment you step over the threshold of your new property.
Understanding Your Financial Position
The first and perhaps most crucial step in the home-buying process is understanding your financial situation. This includes assessing your savings, income, and current debts. Here’s how you can prepare:
1. Deposit: Generally, you’ll need at least 5% of the property price as a deposit, though aiming for 10% or more can provide better mortgage rates.
2. Income and Expenses: Use a budget planner to assess your monthly income against your expenses. This will help you understand how much you can afford in monthly mortgage repayments.
3. Credit Score: Lenders will evaluate your credit score to determine your mortgage eligibility. So it’s important to have a good credit score, and you should work on it if required.
4. Mortgage Options: Speak to a mortgage advisor to understand different types of mortgages, such as fixed-rate, variable-rate, and help-to-buy schemes.
Getting a Mortgage Agreement in Principle
A Mortgage Agreement in Principle (AIP) is a statement from a lender indicating how much they’ll likely lend you. You will be a more attractive buyer with an AIP as it shows sellers you’re serious and financially prepared.
Deciding What You Want
Before you start viewing properties, it’s essential to know what you’re looking for. Consider the following factors:
1. Location: Proximity to work, schools, public transport, and amenities are key. Research neighbourhoods to find the best fit for your lifestyle.
2. Property Type: Decide whether you want a flat, terraced house, semi-detached, or detached property. Each has its pros and cons.
3. Must-Haves: Make a list of non-negotiables, such as the number of bedrooms, garden size, and parking facilities.
4. Future Proofing: Consider your future needs. Are you planning to start a family? Do you need space for a home office?
Starting the Property Search
With a clear idea of what you’re looking for, you can begin your property search. Here are some tips:
1. Use Online Portals: Websites like Rightmove, Zoopla, and OnTheMarket are excellent starting points. Set up alerts to get notified of new listings that meet your criteria.
2. Visit Estate Agents: Register with local estate agents who can provide insights into the market and inform you of new properties before they’re listed online.
3. Attend Viewings: Don’t rush this part. Visit several properties to get a feel for what’s available in your price range.
Making an Offer
Once you find a property you love, it’s time to make an offer. Here’s how to approach it:
1. Research: Check the selling prices of similar properties in the area to gauge a fair offer.
2. Negotiate: Don’t be afraid to negotiate. The starting point is most usually the asking price.
3. Conditions: You might include conditions in your offer, such as the inclusion of certain fixtures or a specific moving date.
The Legal Process
If your offer is accepted, the legal process begins. You’ll need a solicitor or licensed conveyancer to handle the legalities. Here’s what to expect:
1. Conveyancing: This is the legal transfer of property ownership. Your solicitor will handle this, including conducting searches, dealing with the Land Registry, and transferring the funds.
2. Surveys and Inspections: Arrange for a property survey to check for structural issues. There are different types of surveys, from basic condition reports to full structural surveys.
3. Mortgage Finalisation: Once the survey is complete and satisfactory, your mortgage can be finalised.
4. Exchange of Contracts: This is when the sale becomes legally binding. You’ll pay your deposit at this stage.
5. Completion: On the agreed completion date, the remaining money is transferred, and you receive the keys to your new home.
Moving In
Moving day can be hectic, but planning can ease the stress:
1. Hire a Removal Company: Book a reliable removal company well in advance. Discover the best deals by getting quotes from multiple companies.
2. Pack Strategically: Label your boxes by room and keep essential items accessible.
3. Notify Utilities and Change Address: Inform your utility providers of your move date and update your address with banks, the DVLA, and other important institutions.
Settling In
Get settled. Introduce yourself to the neighbours, familiarise yourself with the local area, and really start to make the place your own.
Here are a few final tips:
1. Safety Checks: Make sure that your smoke alarms and carbon monoxide detectors are working, and make sure that you know where the gas and electricity meters are located.
2. Maintenance Plan: Keep a record of the smooth functioning of your new home with a maintenance schedule, complete with regular checks and seasonal tasks.
3. Personal Touches: Add personal touches to make the space feel like home. This can be from putting up family photos or redoing the decoration in your rooms.
Conclusion
Buying your very first home in the UK is most definitely a milestone, difficult and full of challenges but rewarding in the end. Such a philosophy guides you in understanding finances and knowing what you want to achieve from detailed research, and seeking professional advice that confidently helps you navigate the property market. Yes, the journey may have its hurdles, but in the end—owning your own home—the reward will be worth the effort. Welcome to your new chapter!
SEE ALSO: Conquer the Chaos: Hacks to Clean Your Home in Half the Time
Learning
5 Health Benefits of Regular Pedicures

There’s nothing quite like a pedicure to keep your feet looking and feeling their best, but did you know that pedicures do more than simply enhance the appearance of your feet? Many people don’t realize that regular pedicures can come with a wide range of health benefits that can promote the well-being of your feet, so here are some ways that your routine pedicure keeps both your toenails and feet in the best condition possible!
Smoother Skin
One of the biggest misconceptions about pedicures is that they only cater to and look after your toenails. While you’ll definitely be leaving each session with a fresh coat of nail polish, your pedicure can also do wonders for the health of your skin. Aside from trimming and shaping your nails and cuticles, you’ll notice that your nail technician also dedicates a few steps to the skin of your feet.
After inspecting your feet and looking for any issues or imperfections that may need to be addressed, your technician will work on an exfoliating scrub to remove any dead skin cells. This step may also be aided by a foot file, which can be used to buff away any calluses and other problem areas manually.
Softer Skin
After your nail technician addresses all the problem areas of your feet and removes any unwanted dead skin cells, he or she will often massage in a moisturizing product, such as lotion, cream, or butter, to ensure that your skin is properly moisturized. These products contain skin-loving ingredients that will ensure that your feet have everything they need to look and feel their best so that you can walk out of your pedicure with a renewed sense of confidence.
Healthier Nails
After your pedicure session, your nails will not only look better due to the fresh coat of nail polish, but they’ll also be healthier and stronger. This is because your nail technician takes their time to ensure that your nails are properly looked after through steps that include deep cleaning, nail trimming, nail filing, and cuticle care. All of these things work together to prevent issues like ingrown nails from occurring, all the while improving the appearance of your nails.
Increased Blood Circulation
While the specific steps included in your pedicure will depend on the beauty salon, most pedicures will have a massage step somewhere in the mix. One of the often overlooked benefits of these massages is the increased blood circulation, which can deliver more nutrients and oxygen to your feet and nails, promoting their health and appearance. Aside from that, better blood flow means reduced tension and soreness, as well as better distributed heat throughout your body.
Reduced Infections
A significant amount of dirt and bacteria can build up on your feet without you even realizing it, but pedicures can be a great way to prevent these from happening in the first place. The exfoliation step of a pedicure removes dead skin cells as well as all the debris that may have accumulated underneath, and the deep cleaning of your toenails and cuticles also gets rid of any impurities that may have slipped beneath them, which can stop infections from happening.
These are some of the many health benefits that you can look forward to at your next pedicure appointment. However, it’s worth noting that you need to book regular sessions to truly reap all the rewards. This can be difficult, especially when you don’t feel like driving to your nearest nail salon after a long day, but the good news is that you can enjoy the salon experience in the comfort of your own home with a home pedicure service.
Learning
Commercial Boiler Installation Services London

For businesses in the bustling city of London, having a reliable heating system is crucial. Whether you’re opening a new office, expanding your current premises, or simply upgrading an outdated system, commercial boiler installation services for businesses in London are essential to ensure your operations run smoothly and efficiently. Proper installation and maintenance of commercial boilers can make a significant difference in energy efficiency, cost savings, and the overall comfort of your workspace.
The Importance of Professional Installation
When it comes to installing a commercial boiler, professional expertise is paramount. Here’s why:
- Efficiency and Performance: Professional installation ensures that your boiler operates at peak efficiency, reducing energy consumption and lowering utility bills. A well-installed boiler can effectively meet the heating demands of your business without unnecessary energy waste.
- Safety: Commercial boilers are complex systems that require precise installation to operate safely. Professional installers adhere to stringent safety standards and regulations, minimizing the risk of accidents and ensuring the safety of your employees and premises.
- Compliance with Regulations: Commercial properties are subject to various building codes and regulations. Professional installers are well-versed in these requirements and ensure that your boiler system complies with all local laws and standards.
- Longevity and Reliability: Proper installation is critical to the longevity and reliability of your boiler. A professional installation can prevent common issues such as leaks, pressure problems, and system failures, ensuring that your boiler runs smoothly for years to come.
Key Considerations for Commercial Boiler Installation
When planning for a commercial boiler installation, several factors need to be considered:
- Type of Boiler: The type of boiler you choose will depend on your business’s specific needs. Options include gas boilers, oil boilers, and electric boilers, each with its own set of advantages. Consulting with a professional can help you determine the best choice for your business.
- Sizing and Capacity: The boiler’s size and capacity must match the heating demands of your commercial space. An undersized boiler will struggle to meet your needs, while an oversized one will lead to inefficiencies and higher costs.
- Location: The placement of your boiler affects its efficiency and accessibility for maintenance. Professional installers can help you choose the optimal location for your boiler.
- Integration with Existing Systems: If you’re upgrading or replacing an existing boiler, it’s essential to ensure compatibility with your current heating system. Professional installers can seamlessly integrate the new boiler with your existing setup.
Choosing the Right Installation Service

Selecting the right installation service provider is crucial to the success of your boiler installation project. Consider the following when making your choice:
- Experience and Expertise: Look for a provider with a proven track record in commercial boiler installations. Experienced installers can handle the complexities of commercial systems and provide high-quality workmanship.
- Reputation: Check reviews and testimonials from previous clients to gauge the provider’s reliability and customer satisfaction.
- Comprehensive Services: Choose a provider that offers a full range of services, including installation, maintenance, and repair. This ensures that all your boiler needs are met by a single, trusted source.
In London, ROWLEN is a reputable name known for delivering top-notch commercial boiler installation services. Their team of experts is dedicated to providing efficient, safe, and compliant installations tailored to the unique needs of businesses.
Conclusion
Investing in professional commercial boiler installation services for businesses in London is essential for ensuring efficiency, safety, and long-term reliability. By choosing an experienced and reputable service provider like ROWLEN, you can rest assured that your heating system will be installed correctly and maintained to the highest standards. Proper installation not only enhances the performance of your boiler but also contributes to the overall comfort and productivity of your business environment.
SEE ALSO:
-

 News3 years ago
Let’s Know About Ultra High Net Worth Individual
-
Entertainment2 years ago
Mabelle Prior: The Voice of Hope, Resilience, and Diversity Inspiring Generations
-

 Health4 years ago
How Much Ivermectin Should You Take?
-

 Tech2 years ago
Top Forex Brokers of 2023: Reviews and Analysis for Successful Trading
-

 Lifestyles3 years ago
Aries Soulmate Signs
-

 Movies2 years ago
What Should I Do If Disney Plus Keeps Logging Me Out of TV?
-

 Health3 years ago
Can I Buy Ivermectin Without A Prescription in the USA?
-

 Learning3 years ago
Virtual Numbers: What Are They For?